The Appointment Book is an electronic scheduler that helps you manage your patient appointments. Understanding the different parts of the Appointment Book, including its tools and features, will make your scheduling tasks easier.
Examine the image and table below, to learn how to use the different icons and functions in the Appointment Book.
(Note: There is no video for this lesson.)

Appointment Book Areas Defined
 |
Date Bar – Located just beneath the toolbar, this area displays the currently selected date while viewing the Appointment Book. |
 |
Navigation Buttons – These buttons are used to move the Appointment Book from day to day. The left button is used to move backward, the circular button is used to return to the current day, and the right button is used to move forward. |
 |
Calendar Button – This button is used to open a calendar from which you can pick a specific date, and navigate quickly to dates in the future or the past. |
 |
Operatory Columns – The Appointment Book is divided into columns that represent the operatories in your practice. |
 |
Day Note – This button is used to write and store Day Notes. The button turns yellow when a Day Note exists for the selected day. |
 |
Provider Color Bar – On the left side of the Appointment Book, colored columns are displayed for each provider. A colored block in this column represents the provider that is scheduled to treat a patient during the block of time. |
 |
Time Bar – By default the Time Bar displays on the left side of the Appointment Book according to the time block size you set. A red indicator on the Time Bar indicates the current time of day. |
 |
Day View – This button changes the Appointment Book to view a single day’s worth of appointments at a time. |
 |
Week View – This button changes the Appointment Book to view an entire week’s worth of appointments at a time. |
 |
Month View – This button changes the Appointment Book to view an entire month at a time. |
 |
Pinboard – This area is used to temporarily store appointments when scheduling. Click on an appointment and drag it to the white space within the Pinboard and drop it there temporarily while you find an open appointment time. |
 |
Flip Tabs – These tabs are used to jump forward or backward in the Appointment Book according to a defined length of time, such as seven days, two weeks, or four months, or to a specific date. Flip tabs are not set up when you install Dentrix. For more information, see Setting Up Flip Tabs in the Dentrix Help. |
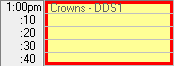 |
Time Blocks – Used to reserve specific times in the Appointment Book for certain types of appointments, such as crowns and exams. |
Additional Tips
- Open and closed time for your practice is designated in the Appointment Book by different screen colors. You can customize the colors in the Appointment Book by clicking Setup > Practice Appointment Setup and selecting options in the Screen Color group box.
- To create a Day Note, click Note and enter the note in the text field.
- The Provider Color Bar display is based on providers set up in Dentrix and how Appointment Book views are set to display.
- You can customize the Time Bar to also display on the right side of the Appointment Book.
- In the Appointment Book’s Month View, Dentrix lists each provider according to ID color for each workday in the month. The time of day displays across the top of the Appointment Book instead of in the left and/or right margins.
- Depending on the way you view the Appointment Book, the Navigation Buttons function differently. For example, if you display the Appointment Book’s Week View, the buttons will move forward or backward one week at a time. If you display the Appointment Book’s Month View, the buttons will move forward or backward one month at a time.
- An appointment icon on the Pinboard contains the patient’s first initial and the first four letters of his or her last name.
- If the patient is new, the letters “NP” (for New Patient) appears in the upper-right corner of the appointment.
- When you drag an appointment from the Appointment Book to the Pinboard, the appointment remains in the Appointment Book in its original time slot. When you move that same appointment from the Pinboard to a new time slot, the original appointment is removed from the Appointment Book and displayed in the new time slot. This prevents another appointment from being scheduled in its place while you search for a new time slot.
- Time blocks can only be viewed if Perfect Day Scheduling is enabled. To learn more about perfect day scheduling, read Setting Up Time Blocks and Activating Perfect Day Scheduling in Dentrix Help.
- To learn more about identifying areas of the Appointment Book, review the topics in Appointment Book Window in Dentrix Help.