In the Appointment Book, patient appointments are represented by colored blocks that contain information about the patient, the procedures, and the provider assigned to the appointment. Appointments may also include alert icons in the upper-right corner of the appointment.
Examine the image and table below to learn how to use the different symbols in the Appointment Book. (Note: There is no video for this lesson.)
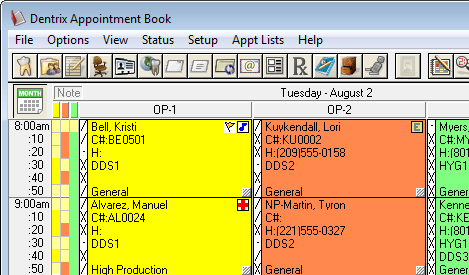
Appointment Symbols Defined
| Appointment Note – The icon indicates the patient’s appointment has a note attached to it. Click the icon to view the note. | |
| Insurance Eligibility – The icon changes color to indicate a patient’s insurance eligibility. Click the icon to check the patient’s eligibility. For more information, read Checking Insurance Eligibility in Dentrix Help. | |
| Lab Case – The “L” icon appears on a patient’s appointment when you select the Lab Case option for the appointment. Click the icon to open the attached lab case. The icon changes color to represent the status of the lab case. For more information, read Viewing Appointments Attached to a Lab Case in Dentrix Help. | |
| Health History Alert – The icon indicates the patient has a medical condition or allergy in their Health History. Click the icon to view the patient’s Health History/Notes. | |
| Patient Alert – The icon indicates the patient has an alert. Click the icon to view the patient alert. | |
| New Patient – The letters “NP” in front of a patient’s name indicate that the appointment is for a new patient who does not yet have a patient account created in the Family File. | |
 |
Appointment Time Pattern – The icon shows the length of the appointment broken into time intervals. Each interval is assigned as provider time (X), assistant time (/), or chair time (-). For more information, read Changing Appointment Lengths in Dentrix Help. |
 |
Resize Handle – This icon, located in the bottom-right corner of the appointment, is used to increase or decrease the length of an appointment. Drag the icon upward to shorten the appointment length or downward to increase the appointment length. |
Additional Tips
- When you click the alert icon, Dentrix provides additional information and options about the specific alert.
- Because an “NP” appointment does not have a patient account created for it, several options in the Appointment Book are disabled, such as completing the appointment and attaching continuing care to it. Once you create a patient record in the Family File, Dentrix enables these options.
- To help keep the Appointment Book organized, an appointment’s color corresponds with the provider assigned to the appointment. For more information about assigning colors to providers, read Assigning Colors to Providers in Dentrix Help.
- The icons in the toolbar across the top of the screen help you get to other functions in Dentrix. To learn more about what the icons mean, read The Appointment Book Toolbar in Dentrix Help.
- To learn more about identifying Appointment Book Symbols, read Viewing Appointment Alerts, and Appointment Blocks Overview in Dentrix Help.
Check Your Knowledge
If you have access to Dentrix, check your knowledge with this exercise.
- Switch to the Dentrix demo database.
(Skip this step if you are using the Dentrix Learning Edition software.) - From the Appointment Book, locate the appointment for Tina Young and identify her medical condition.